Rationale
This session is focused on showing a typical effort to get something working on a general purpose embedded operating system.
Typically, you will have to search for information (forums, blogs, web pages, datasheets, manuals, electronic schematics, etc.), install software, tweak your embedded OS, install drivers, … to get something working. Finally, you can go back to the «programming session» concept and develop the application of your choice.
I would like to illustrate this idea and, meanwhilw we develop the activity, I will explain OS concepts associated with the activity.
For the sake of clarity, only software available in the Linux repositories is used in this sesion. Therefore, you will not download source code from the code repositories or build as in previous sessions.
Assuming that you are «telco», I decided to choose something modern, well recognized and surprising (from my point of view: Software Defined Radio (SDR).
ATCHUNG! This session involves installing software and running time-consuming applications, so we will overlap installing/running with looking for external information.
Software Defined Radio (SDR) concepts
Some very basic facts about Software Defined Radio. Please correct me if I say something incorrect 😉
Hell, I need more space in the SD
Raspberry Pi OS keeps growing year by year!. It’s full of cra*
Please, test the available space in your SD
$ df
If there is no space (about 2GB), uninstall something
$ sudo apt purge libreoffice*
$ sudo apt purge wolfram-engine
$ sudo apt clean
$ sudo apt autoremove
And test available space
$ df
Playing with a DVB-T USB dongle
Well, let’s get thing set up before we go to SDR playground.
I have provided you with a typical (well, it looks typical) DVB-T USB dongle described in the equipment section and purchased from Amazon.
Of course, the purpose of the dongle is to watch TV. Doing it on Microsoft Windows with a closed source commercial application bundled with your dongle is not amazing. So let’s try to make it work on Linux using OPEN SOURCE SOFTWARE (Yes, I’m crying).
The reference page for watching TV on Linux boxes is the LinuxTV site.
Let’s start.
- Please turn on your Linux machine
- Plug the DVB-T USB dongle
- Open a terminal and issue the command dmesg
$ dmesg
On my RPi I obtained the following output
[   67.153264] usb 1-1.4: new high-speed USB device number 6 using dwc_otg
[   67.265292] usb 1-1.4: New USB device found, idVendor=1d19, idProduct=1101
[   67.265322] usb 1-1.4: New USB device strings: Mfr=1, Product=2, SerialNumber=3
[   67.265339] usb 1-1.4: Product: DVB-T Dongle
[   67.265355] usb 1-1.4: Manufacturer: Realtek
[   67.265371] usb 1-1.4: SerialNumber: 00000991
[   67.343319] usb 1-1.4: dvb_usb_v2: found a 'Dexatek DK DVB-T Dongle' in warm state
[   67.375724] usb 1-1.4: dvb_usb_v2: will pass the complete MPEG2 transport stream to the software demuxer
[   67.375790] DVB: registering new adapter (Dexatek DK DVB-T Dongle)
[   67.394259] i2c i2c-3: Added multiplexed i2c bus 4
[   67.394287] rtl2832 3-0010: Realtek RTL2832 successfully attached
[   67.394330] usb 1-1.4: DVB: registering adapter 0 frontend 0 (Realtek RTL2832 (DVB-T))...
[   67.409628] fc0013: Fitipower FC0013 successfully attached.
[   67.421851] Registered IR keymap rc-empty
[   67.422223] input: Dexatek DK DVB-T Dongle as /devices/platform/soc/3f980000.usb/usb1/1-1/1-1.4/rc/rc0/input3
[   67.422503] rc0: Dexatek DK DVB-T Dongle as /devices/platform/soc/3f980000.usb/usb1/1-1/1-1.4/rc/rc0
[   67.430333] IR NEC protocol handler initialized
[   67.433824] IR RC5(x/sz) protocol handler initialized
[   67.437937] IR RC6 protocol handler initialized
[   67.441147] IR JVC protocol handler initialized
[   67.444658] IR Sony protocol handler initialized
[   67.449079] IR Sharp protocol handler initialized
[   67.449140] IR SANYO protocol handler initialized
[   67.452303] usb 1-1.4: dvb_usb_v2: schedule remote query interval to 200 msecs
[   67.454732] input: MCE IR Keyboard/Mouse (dvb_usb_rtl28xxu) as /devices/virtual/input/input4
[   67.458161] IR MCE Keyboard/mouse protocol handler initialized
[   67.461227] usb 1-1.4: dvb_usb_v2: 'Dexatek DK DVB-T Dongle' successfully initialized and connected
[   67.461478] usbcore: registered new interface driver dvb_usb_rtl28xxu
[   67.461550] lirc_dev: IR Remote Control driver registered, major 243
[   67.465894] rc rc0: lirc_dev: driver ir-lirc-codec (dvb_usb_rtl28xxu) registered at minor = 0
[   67.465924] IR LIRC bridge handler initialized
[   67.467099] IR XMP protocol handler initialized
This output shows messages from the Linux kernel. At the end of the log there are messages about our dongle because it is the latest device inserted in the machine. The use of «dmesg» or similar stuff is a typical action of a developer when inserting a new «thing».
Carefully read these messages and try to understand their meaning. Search the Internet for understanding the interesting details about this output.
We are happy! The Linux kernel recognizes the dongle (drivers installed) and shows good chips for RTL-SDR (Realtek RTL2832 and Fitipower FC0013 chips).
Run the following command to try to understand something about dmesg.
$ man dmesg
Errr … well, probably you won’t understand anything this time. But now you are aware that man command continues here.
Let’s continue. To watching TV, we need tuning information about TV andradio stations. There are tables on the Internet for that, but we can use some utilities to scan the sky.
First, we need more software (open and free), let’s install it from repositories
$ sudo apt install w-scan dvb-apps
Now you can run a scan utility. Run it in one terminal and use man in another terminal.
$ mkdir wowsdr
$ cd wowsdr
$ w_scan -ft -c ES -X > channels.conf
You should get an output similar to this
FREQ (174.00MHz ... 862.00MHz)
219500: (time: 00:19)
226500: (time: 00:22)
Scanning 8MHz frequencies...

762000: (time: 03:40) (time: 03:41) signal ok:
    QAM_AUTO f = 762000 kHz I999B8C999D999T999G999Y999
    updating transponder:
       (QAM_AUTO f = 762000 kHz I999B8C999D999T999G999Y999) 0x0000
    to (QAM_64   f = 762000 kHz I999B8C23D0T8G4Y0) 0x405A
...
Use man to understand the parameters utilized for the new command w_scan.
Well, you are a «telco» so please explain to me the meaning of «MHz», «QAM», …
Take a look at the channels.conf file. It is a text file. Try to understand its contents.
Now we are ready to watc TV, we need a video playback utility (VLC, mplayer, Kaffeine, …) and redirect the decoded data stream to these applications. Let’s try it.
$ sudo apt install mplayer
$ mplayer
The last command is just to allow mplayer to create a default configuration for the user
$ cp channels.conf ~/.mplayer/
$ mplayer dvb://"PARAMOUNT NETWORK(PARAMOUNT NETWORK)"
The parameter for mplayer is taken from the contents of channels.conf file. Check your own file for available channels.
You should get an image similar to this one (fingers crossed).

Activity: headphones
Oh! Hell! This year our monitors have no audio input.
Plug in the headphones, plug-in in your ears … Does it work? No?
Well, this is a typical embedded system and OS configuration problem. Practice to solve it!.
Please let me know what the problem is and your proposed solution.
RTL-SDR
The cheapest option to start playing with SDR is to use a commercial DVB-T USB dongle and benefit of the RTL-SDR effort. Most dongles are not adequate, so you have to do some research to get the appropriate one.
In our case, I chose the dongle showed in the equipment section and bought it from Amazon.
In this section, I will show you how to get a working SDR environment using the dongle, an embedded platform (RPi), the Linux OS, and adequate pieces of software. For an inexperienced newbie, this could amount to 10/20 hours of work.
Installing RTL-SDR
Well, let’s hack. It is time for using the dongle for other things. You can scan an incredible range of frequencies with this device and decode data using software radio blocks.
Install «the easy way». NOTE: This will require alonooongggg time. Perfect for coffee break.
$ sudo apt install gnuradio gr-osmosdr osmo-sdr rtl-sdr
or follow available instructions at http://sdr.osmocom.org/trac/wiki/rtl-sdr.
Setup udev rules
Ein? What «udev» means? The simple response is that your OS if full of configuration files.
In this case we are going to configure the option that the operating system will choose when connecting a certain device.
Well, you need to add some udev rules to make the dongle available. First, you have to find the vendor id and product id of your dongle. This is typical USB bla, bla. Run:
$ lsusb
and locate the line that identifies the dongle. For my dongle it is:
Bus 002 Device 016: ID 1d19:1101 Dexatek Technology Ltd. DK DVB-T Dongle
where «1d19» is the vendor id and «1101» is the device id.
Now CAREFULLY, do the following
$ sudo bash
# cd /etc/udev/rules.d
# ls
# nano 20.rtlsdr.rules
Add the following line and save the file,
SUBSYSTEM=="usb", ATTRS{idVendor}=="1d19", ATTRS{idProduct}=="1101", GROUP="adm", MODE="0666", SYMLINK+="rtl_sdr"
Unplug the DVB-T dongle and run,
(For Ubuntu 12.04)
$ sudo restart udev
(For raspberry)
$ sudo udevadm control --reload-rules
Or, simply, reboot the system.
Testing operation
Plug in the USB dongle and test for correct access to the dongle using the rtl_test utility
$ rtl_test
If you get the following error,
Found 1 device(s):
0: Realtek, DVB-T Dongle, SN: 00000991
Using device 0: Dexatek DK DVB-T Dongle (Logilink VG0002A)
Kernel driver is active, or device is claimed by second instance of librtlsdr.
In the first case, please either detach or blacklist the kernel module
(dvb_usb_rtl28xxu), or enable automatic detaching at compile time.
This is because the drivers to watch TV are loaded, and you need to unload it. Temporary solution (every reboot of the system).
$ sudo rmmod dvb_usb_rtl28xxu rtl2832
you can use man to understand the use of rmmod. In essence you are loading/unloading software modules in the OS kernel.
Rerun rtl_test, if the output is similar to the one shown below, then things started working (press Ctrl-C for terminating)
Found 1 device(s):
0: Dexatek DK DVB-T Dongle (Logilink VG0002A)
Using device 0: Dexatek DK DVB-T Dongle (Logilink VG0002A)
Found Fitipower FC0013 tuner
Supported gain values (23): -9.9 -7.3 -6.5 -6.3 -6.0 -5.8 -5.4 5.8 6.1 6.3 6.5 6.7 6.8 7.0 7.1 17.9 18.1 18.2 18.4 18.6 18.8 19.1 19.7
Info: This tool will continuously read from the device, and report if
samples get lost. If you observe no further output, everything is fine.
Reading samples in async mode...
^CSignal caught, exiting!
SDR with gqrx
qqrx is a graphical tool developed using Qt and GNUradio that simplifies the use of SDR for basic reception activities.
This course
$ sudo apt install gqrx-sdr
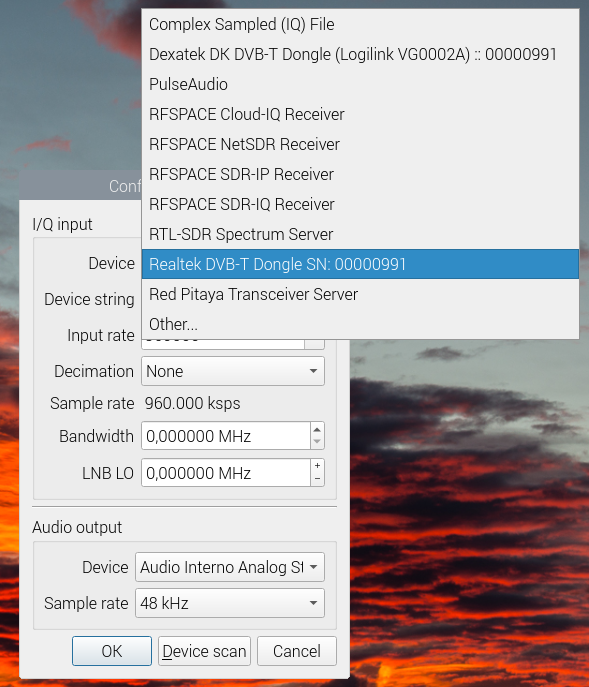
$ gqrx –edit
And configure it in this way, more or less. Reduce the sampling rate to 960000 or less
—- Previous nightmere of courses. Each course is different —
y mira el diálogo de configuración que hay abajo
Install it (I had some trouble with the sound output) …
HELLLLLLLLLLL and now we have «buster» Raspbian.
Try
$ sudo apt install pulseaudio gqrx-sdr
and follow this (but no sound working)
https://raspberrypi.stackexchange.com/questions/639/how-to-get-pulseaudio-running
HELLL it does not work this year, forget these lines …
$ sudo apt-get install pulseaudio
$ sudo apt-get install gqrx-sdr
And follow http://gqrx.dk/download/gqrx-sdr-for-the-raspberry-pi except …
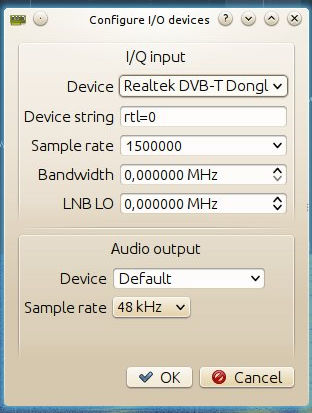
Configure dialog
Activity
Tune for FM at 106.6MHz Radio Clásica (Valencia-Spain). Use your headphones to listen.
NOTE: take into account that the RPi has limited power, so try to reduce sampling rates, bandwidth, etc. to avoid crashes.

Activity
Try to find transmissions in different bands. Use the appropriate demodulation mode to listen to the transmission (perhaps it will data, but you can hear «chirps»).
You can find transmissions of the public services or flight information (flight tracker), etc.
GNU Radio
Amazing project for telecos!.
You have installed GNU radio in previous steps. And gqrx is based on gnuradio project.
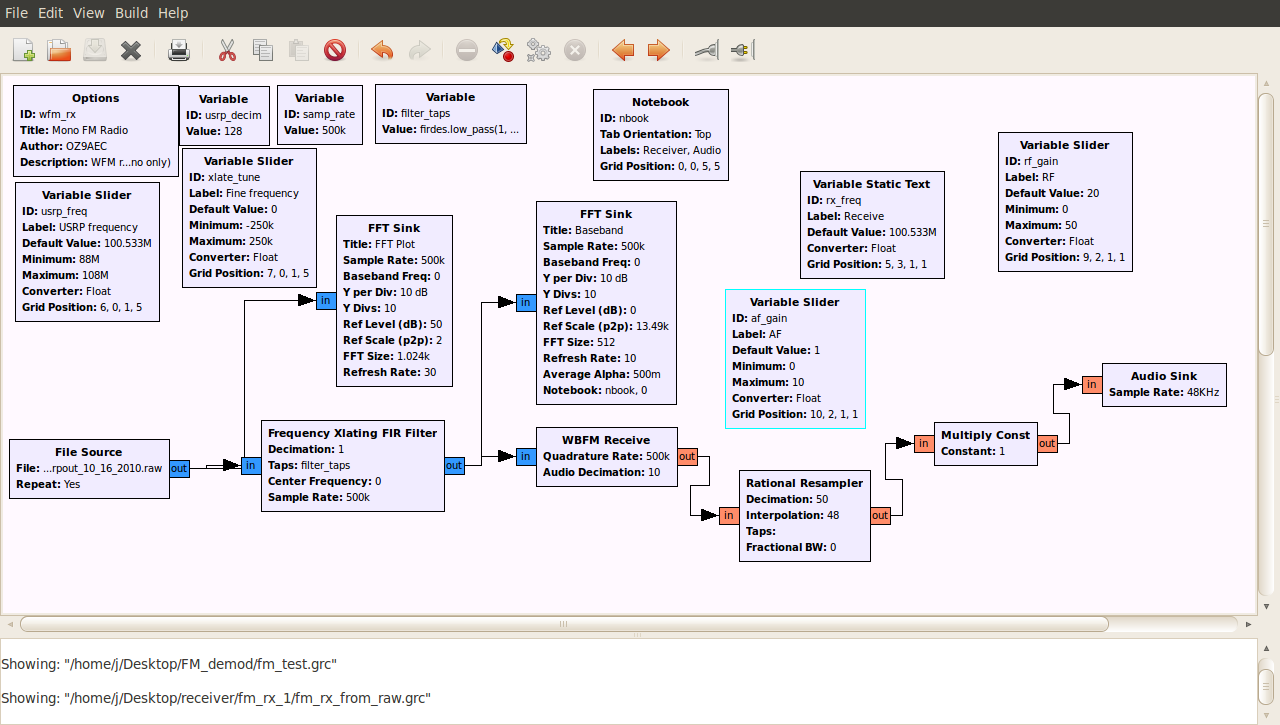
There is a lot of pieces here. Probably, the best option is to start with the GNU Radio Companion utility. GNU Radio Companion (GRC) is a graphical tool to create signal flow graphs and to generate flow-graph source code.
Let’s run it.
$ gnuradio-companion
And start playing. Find information and examples in the Internet.
Task: Morse decoder (CW)
This will be part of your marks.
Install gnuradio in your RPi or your Linux Virtual box (I don’t know if it works for MWindows or MacOS).
Find information about decoding Morse using GNU Radio.
Find or develop a decoder.
Test your decoder on recorded data.
To get the highest mark, you can borrow me the DVB-T USB dongle (when you show me something near to work).
SUBMIT YOUR WORK USING POLIFORMAT TASK ADDING AN SMALL REPORT (max. 4 pages) WITH FOLLOWED STEPS
Task: LoRa decoder
Well, this is another possibility. Really amazing.