Inicio » Entradas etiquetadas como «ARM Cortex-M»
Archivos de la etiqueta: ARM Cortex-M
Comprobación placa nucleo-L476RG
Objetivo
Hay ocasiones en que la placa deja de funcionar y pensamos que se ha estropeado. Es cierto que, si se trata mal, la placa queda inutilizada; pero también puede pasar que nuestra aplicación la bloquea y da esa misma sensación.
Esta entrada pretende ilustrar el procedimiento para recuperar la placa en estos casos.
IMPORTANTE: Hay cables USB muy cutres que no sirven para trabajar con la placa.
Conectando a la placa con el STM32CubeProgr y borrándola
La aplicación STM323CubeProg permite, entre otros, acceder a la memoria flash del micro y borrarla, descargar firmwares, etc. Es ahiora la aplicación oficial de St para estas tareas y el resto ya no están recomendadas popr lo que se recomienda dejar de usar el resto de opciones (p.e. StLink).
La aplicación ofrece muchas opciones de acceso a la placa, pero aquí vamos a asumir que se hace desde el ST-Link-v2 integrado en la propia placa.
Necesitamos un cable USB y conectar la placa al ordenador. Si la placa está bien, se activará una unidad de disco USB. No viene al caso, pero es síntoma de que la placa está funcionando.
Abrimos STM32CubeProg e intentamos acceder a la placa siguiendo los pasos de la siguienter imagen.
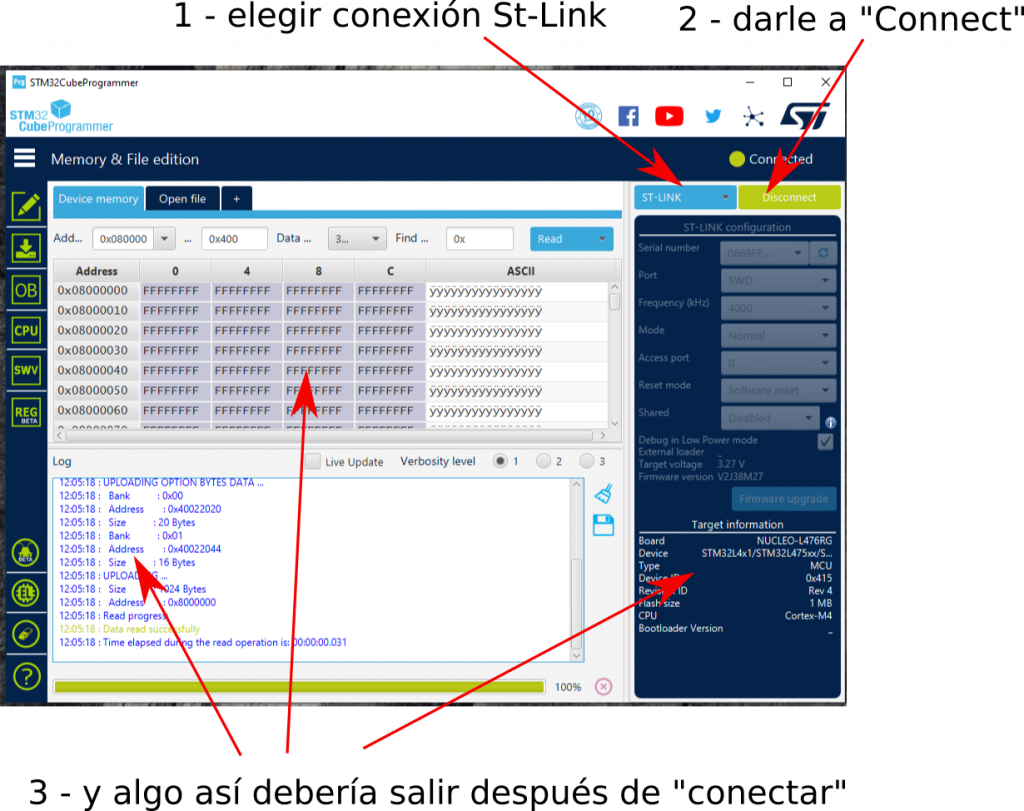
¿Ha ido bien?
Si es así, podemos proceder a borrarla toda siguiendo los pasos indicados en la siguiente imagen.
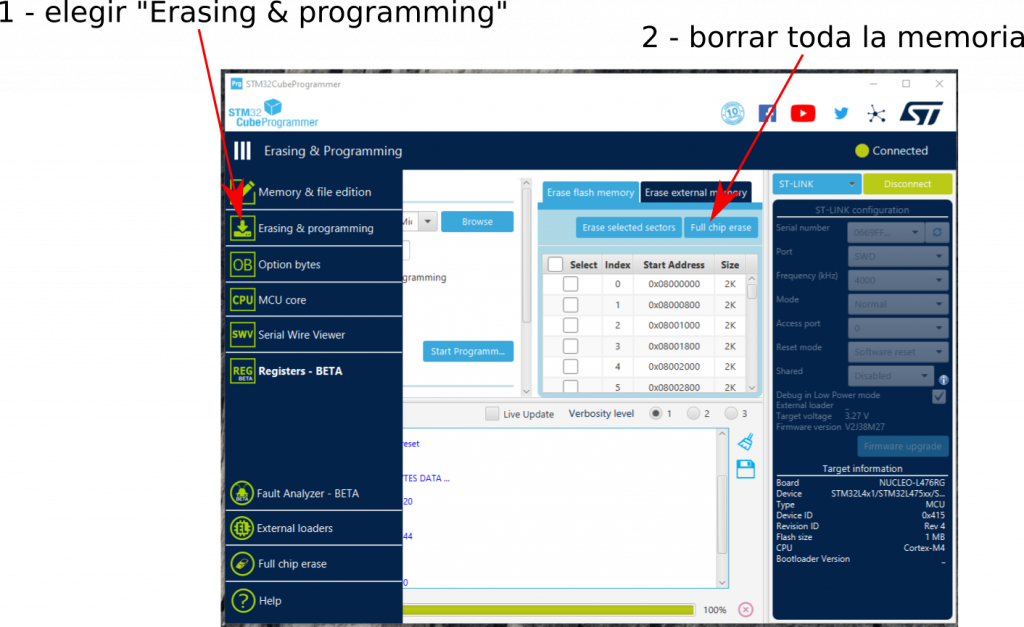
Y placa lista para trabajar.
IMPORTANTE: Una vez que hayamos terminado de usar StCubeProg, darle a «Disconnect» para que la placa pueda usarla otra aplicación, por ejemplo, Keil.
¡No he conseguido acceder a la placa!
Vaya. Pues vamos a probar otras opciones ordenadas de más inmediata a más complicada. Recomendaría empezar por la primera y, si no va, seguir avanzando.
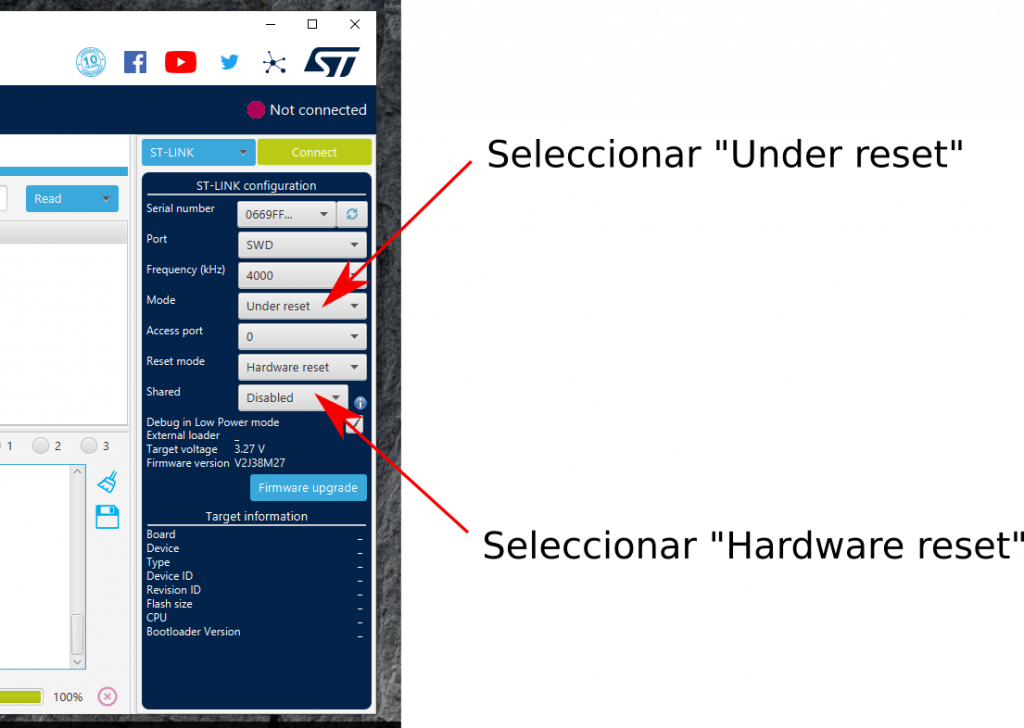
Intentar con el modo «under reset»
Es posible que la placa esté bloqueada porque la aplicación grabada haya modificado las líneas de depuración. Un truco para hacerse de nuevo con el control es que el depurador aplique un reset al microcontrolador y tome el control antes de que la aplicación se inicie.
Esta opción no funcionará, aunque sea activable desde StCubeProg, en sistemas de depuración que no soporten «hardware reset».
Si consigues tomar el control, procede a borrar la flash y listos.
Con «reset» a mano
Esta es una opción poco ortodoxa basada en el pricipio anterior, pero usando un método «digital».
Procede de la siguente manera:
- Abre STM32CubeProg y elige la opción «ST-LINK»
- Conecta la placa al ordenador
- Pulsa el reset de la placa y mantenlo pulsado
- En STM32CubeProg dale a «Connect» y cuenta «uno»
- Suelta inmediatamente el pulsador
Si has conseguido tomar el control, procede a borrar la memoria y listos.
Con modo «bootloader»
Y el último recurso es intentar poner la placa en modo «bootloader». Para ello seguir estos pasos:
- Quita la alimentación a la placa.
- Coloca un jumper o un cablecillo entre los pines 3 y 5 de CN7.
- Alimenta la placa.
- Pulsa el botón de reset.
- Quita el jumper/cablecillo con la placa alimentada.
- Conecta STM32CubeProg a la placa usando el procedimiento normal
- Borra la memoria.
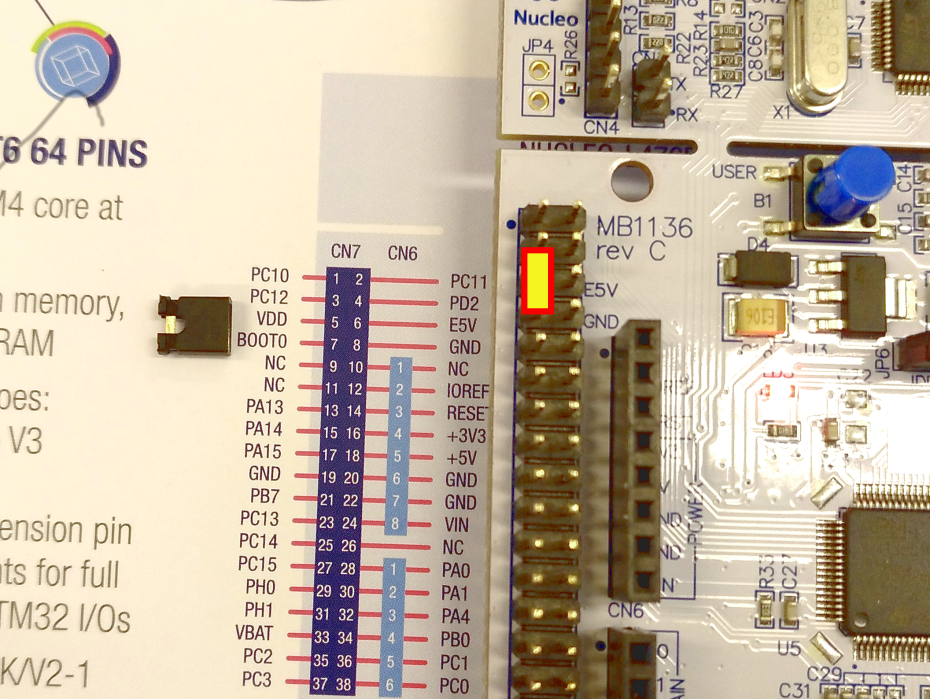
Lo que hemos hecho es poner a «1» el pin BOOT para que la plaque arranque con una aplicación interna grabada por St que se llama «bootloader» y con la que se pueden hacer cosas muy interesantes que no vienen al caso.
Nosotros simplemente nos hemos aprovechado de que la placa ha arrancado con un programa razonable.
Grabando un programa
Para rematar, se puede probar a grabar un programa en la placa para comprobar funcionalidades.
La propuesta es que grabemos en la flash del micro el «ejecutable» resultante de construir una aplicación.
Como ejemplo, se ha construido el ejercicio del módulo delay para que genere un «ejecutable» en formato Intel-HEX que cualquier grabador de memorias flash del mundo mundial suele soportar.
Aquí está el ejemplo de archivo Intel_HEX para grabar en la placa. Descárgalo.
Asumiendo que estamos conectados a la placa con el STM32CubeProg, podemos grabar este «firmware» en la placa y pulsar despues el botón de reset para ver si funciona.
Observa la siguiente imagen para ver los pasos a seguir.
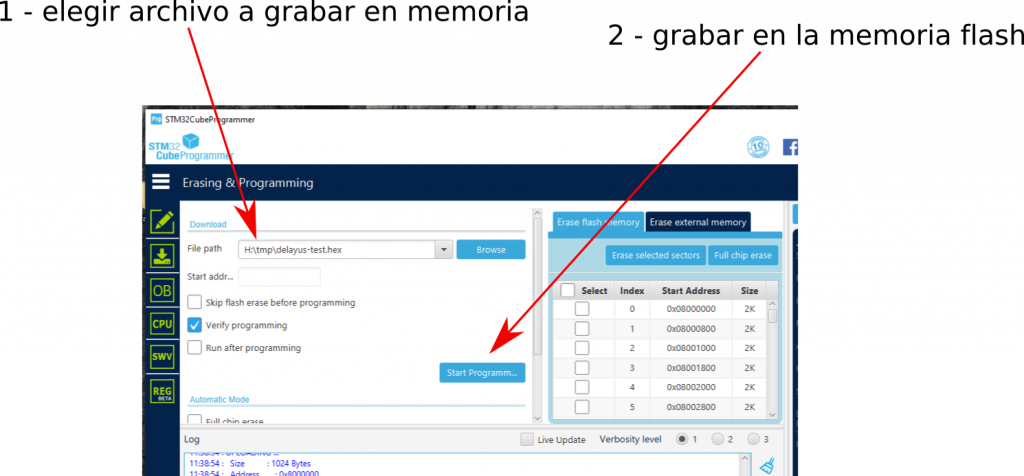
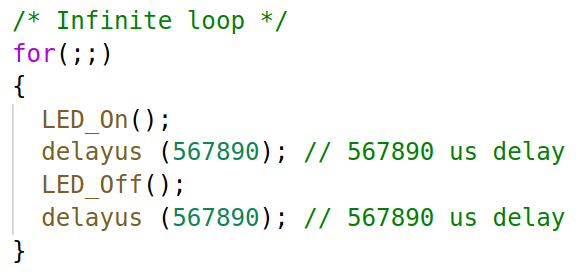
Debería parpaderar el led a un ritmo de 567.890 uS, más o menos. Abajo está el bucle principal de la aplicación usada.
Simulation & emulation of the STM32F4-discovery board
Rationale
The reason for using an STM32 discovery board is its affordability. That’s why I suggested in class that it be purchased for home play.
The course’s lab activity has been designed in such a way as to enhance that possibility, so open-source software and/or limited versions of commercial software are used to allow you to create your own home lab environment.
Using affordable tools maximizes the possibility of entering this complex world of microcontrollers.
I insist that the recommendation is still to get one of these boards. Even in the current situation.
That said, the current situation of confinement at home needs new approaches, so I am trying to find alternative solutions.
The proposal would be to try to simulate/emulate the discovery plate in order to develop the practical activities and the mini-project.
The truth is that I have not found many free/demo/etc options (for example, using Proteus is discarded because I don’t have student licenses for the STM32 module).
The proposal is to use the Keil to simulate non-peripheral code and to use QEMU for ARM to emulate the board.
Simulating with Keil uVision 5
Keil uVision 5 includes a simulator that lets to run code without the need for hardware. Great … but there is a problem. I’d rather start by showing you so you can understand.
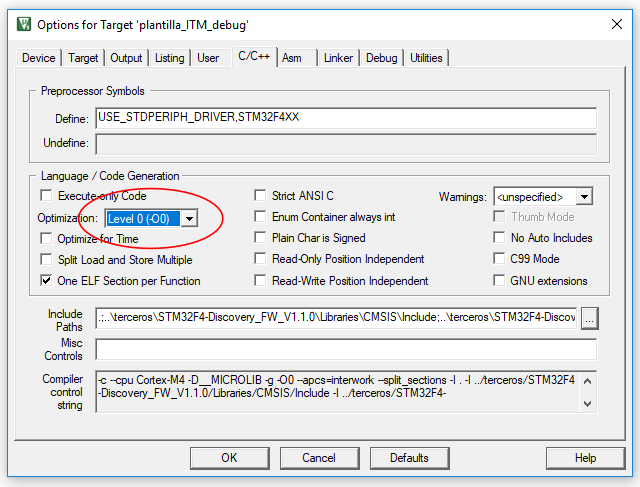
Let’s build the template … -> go to Options of the project -> C/C++ and verify that the compiler optimizations are disables
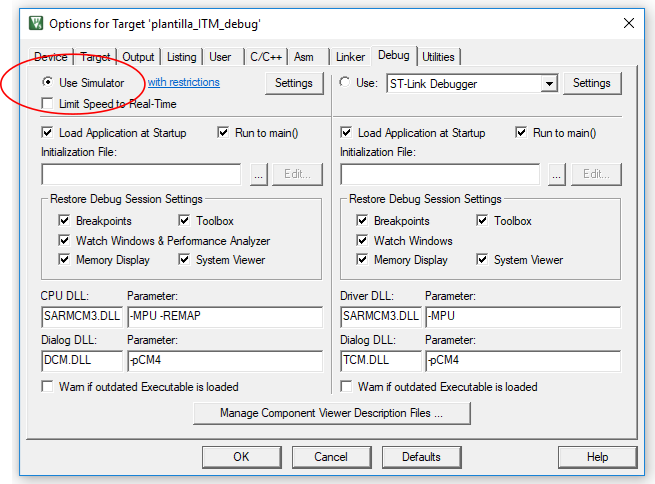
Let’s go to Debug -> Activate the simulator …
Ok, let’s start the Debugging session, play … WHAT THE HELL IS THAT ERROR!!!
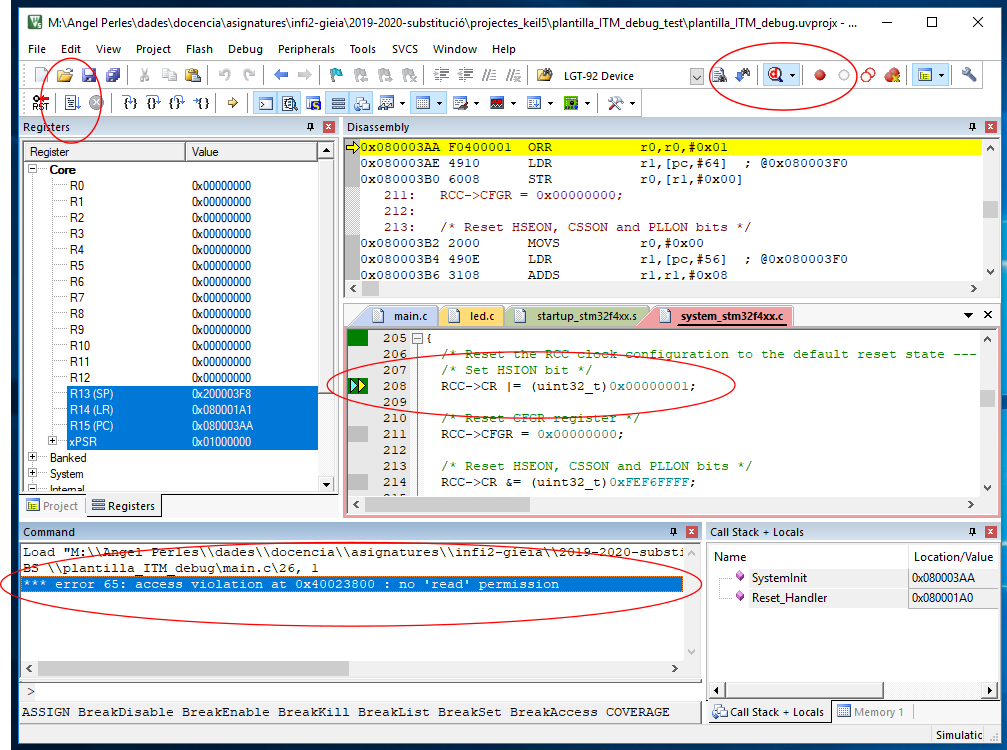
Well, further reading highlights that only the ARM Cortex-M core is simulated, not the manufacturer-specific characteristics such as the devices. In this case, «*** error 65: access violation at …» means that the debugger complains because of the access to a memory position of a peripheral that does not exist in the ARM Cortex-M core.
it is feasible to «step over» these instructions, but a more elegant option is to say to the debugger that it can read-write these positions. To do that, create a .ini file including the following text.
MAP 0x40000000,0x400FFFFF read write
call it keil_lamarequeva.ini for example, and include it in the configuration of the debug session.

And working. See below an example of session with breakpoints and checking the values of some variables.
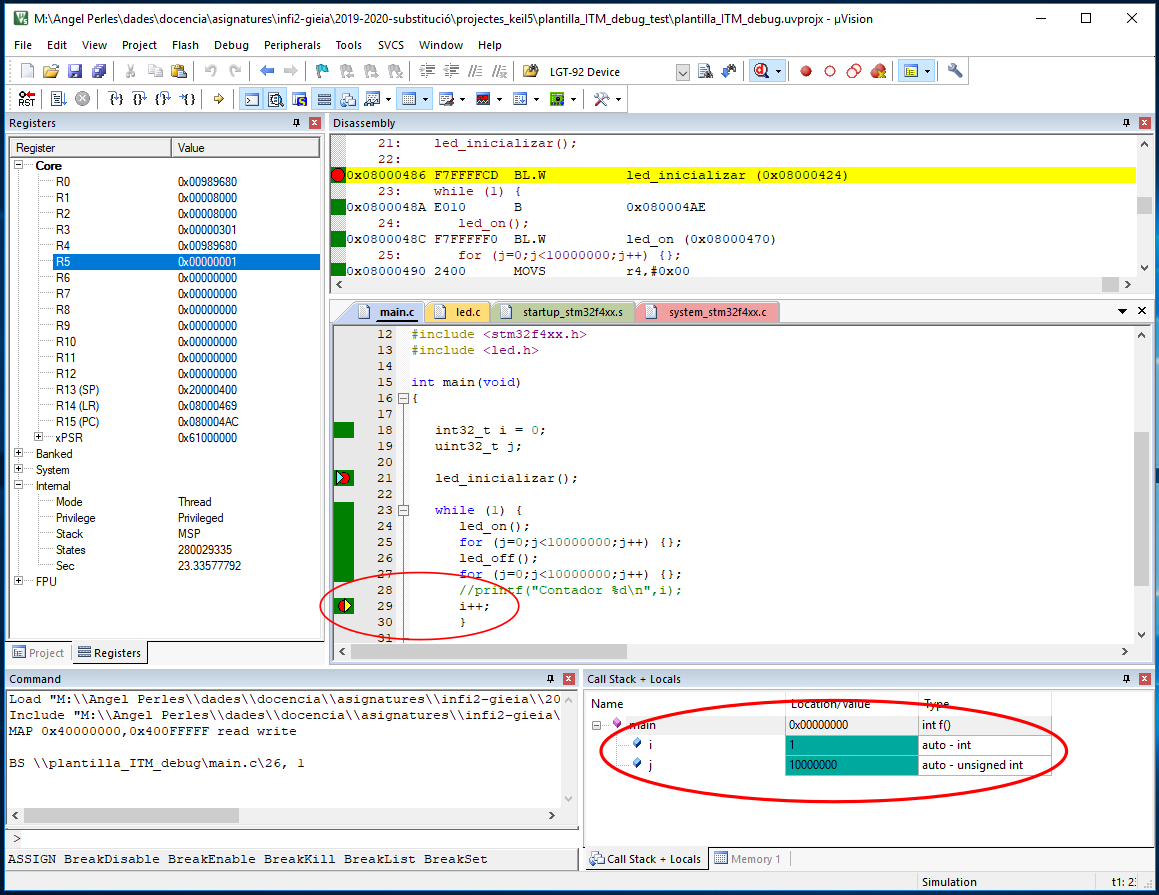
BUT only the «normal» C/C++ code is being evaluated. No peripherals can be tested here.
I suggest this procedure to test the logic of the application. When the application has been developed, then I suggest going to the next section.
Emulating the Stm32f4-discovery
The only «open» way that I found to emulate an STM32 microcontroller is using QEMU.
There is a project named xPack QEMU Arm which purpose is to emulate ARM Cortex-M based microcontrollers and bords. In fact, it supports the STM32F4-Discovery, great!!.
Let’s start installing, you can do it yourself reading the xPack QEMU install instructions. More or less, this is a digest of the steps:
- Assuming MWindows 10, download xpack-qemu-arm-xxxx-win32-x64. zip from the GitHub releases repository
- Uncompress the zip file a move it to C:\Users\<your user>\AppData\Roaming\xPacks You can’t view this directory using Windows Explorer, but it exists. You can use the navigation bar to access it. Do not worry if you see «Usuarios» because it is an «alias» of «Users»

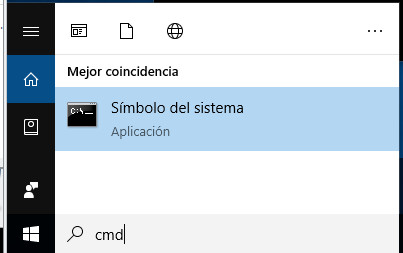
- Check that QEMU operates correctly opening a command window and writing
C:\Users\aperles>"C:\Users\aperles\AppData\Roaming\xPack\QEMU ARM\2.8.0-8\bin\qemu-system-gnuarmeclipse.exe" --version

If it works, then you can now build your Keil project a load the resulting image file in QEMU.
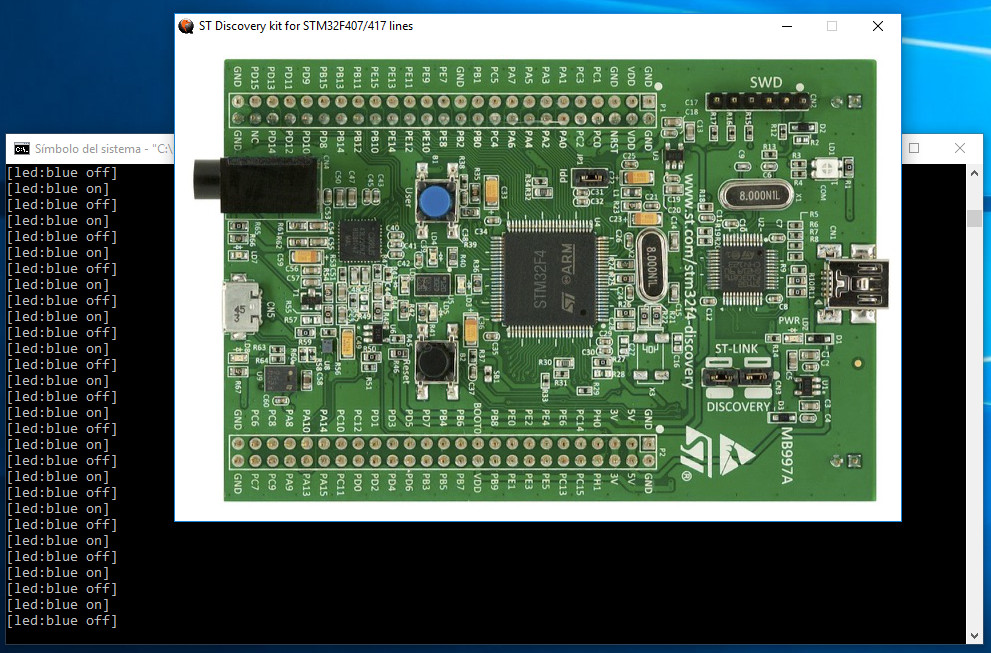
For example, I adapted the official template to handle a LED as shown in the next image,
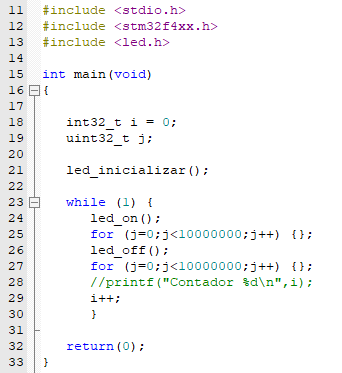
After building the project, and for this specific template, the image file is stored in subfolder «output» and named «plantilla_ITM_debug.axf«. In a different project, simply locate the corresponding».axf» file.

Now load the image using the emulator in the following way adapting routes to find the .axf file if necessary,
H:\tmp>"C:\Users\aperles\AppData\Roaming\xPack\QEMU ARM\2.8.0-8\bin\qemu-system-gnuarmeclipse.exe" --board STM32F4-Discovery --mcu STM32F407VG -d unimp,guest_errors --semihosting-config enable=on,target=native --image plantilla_ITM_debug.axf
And, alehop!!!, your project will show up running in the discovery board.
Let’s go for the LIMITATIONS:
- You cannot debug your project in this way. It is feasible, but you need a GDB-based debugger and this completely out of the scope of this trick. BUy a real Discovery.
- Only a limited set of peripherals is emulated. I think that GPIO, including LEDs and button operation, and some interrupts, but not sure at all. Any volunteers to try?.
More information:
https://xpack.github.io/qemu-arm/options/
ARM Cortex-M práctico. 1 – Introducción a los microcontroladores STM32 de St
¿Qué es esto?
Estoy poniendo por escrito las clases, cacharreos, explicaciones, etc. sobre microcontroladores ARM Cortex-M. Como hay gente que me lo pide, he decidido dejar aquí un borrador de las anotaciones junto con el material adicional.
Los apuntes
Ten en cuenta la licencia con la que se publican estos apuntes.
Descarga «ARM Cortex-M práctico. 1 – Introducción a los microcontroladores STM32 de St»
Código fuente
Bibliotecas y plantillas varias asociadas a los apuntes.
- Plantilla Cube_STM32L476RG-Nucleo basado en FW L4 1.17.0
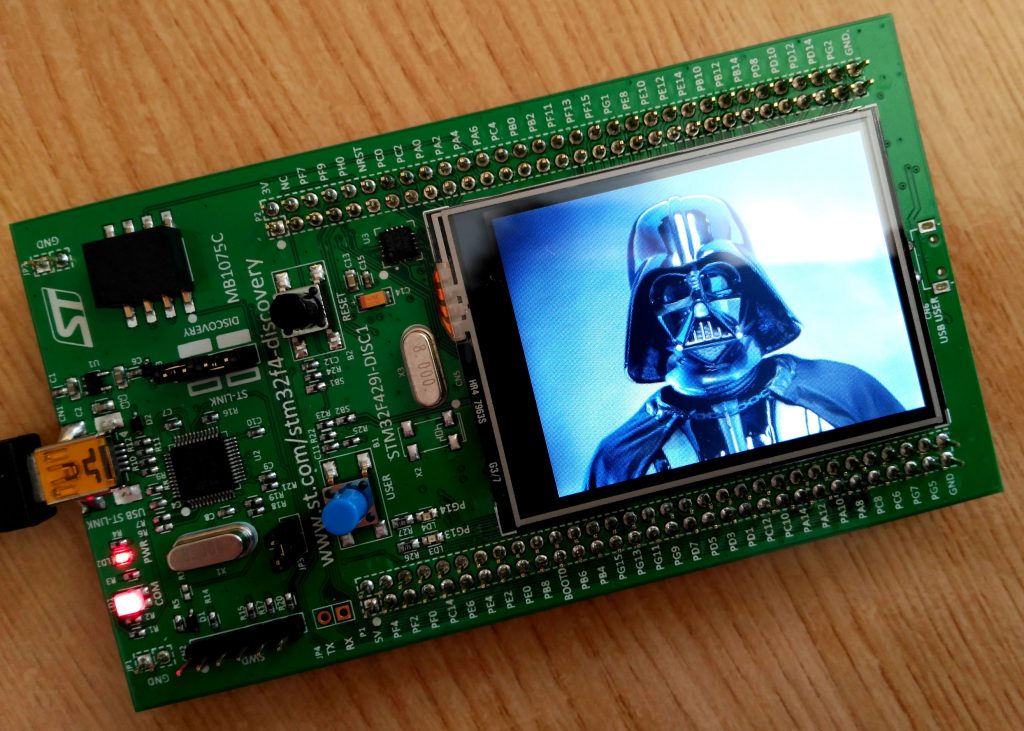
- Plantilla Cube_STM32F429I-Discovery (probado con FW 1.19.0)
- Biblioteca LED para la STM32F429I-Discovery
- Biblioteca STM32F4xx_AP_GPIO
Ejemplos
- Proyecto «CubeLEDS» para la STM32F429I-Discovery
- «CubeLEDS» construido en formato Intel HEX para la STM32F429I-Discovery
- Demo oficial de St en formato Intel HEX
Otros
Documentación de referencia de St
Son copias locales con la versión empleada en los apuntes. Acudir a la web de St para comprobar la última versión
Serie STM32F4. Superpotencia
- STM32F429 datasheet
- STM32F405/415, STM32F407/417, STM32F427/437 and STM32F429/439 STM32F405/415 Reference manual
- UM1725: Description of STM32F4 HAL and LL drivers
- STM32F429/39 HAL-LL User Manual (FW 1.19.0) (obtenido con archmage desde el .chm)
- Discovery kit for STM32F429-439 lines

Serie STM32L4. Potente y ultrabajo consumo
- STM32L476xx datasheet
- STM32L4x5 and STM32L4x6 advanced ARM®-based 32-bit MCUs Reference manual
- UM1884: Description of STM32L4/L4+ HAL and Low-layer drivers
- STM32L486xx HAL-LL User Manual (FW 1.12.0)
- UM1724: STM32 Nucleo-64 boards

Enlaces de interés
De momento los voy soltando como caen
- StMicroelectronics
- ARM mbed
- Bibliotecas y tutoriales de Tilen Majerle para STM32F4 Discovery
- ARMPower UPV
- D. Ponikvar, STM32F407 project
Bibliografía adicional
Pongo un «float» y mi programa falla en el Cortex-M4
El viernes pasado hubo gente en el curso que probó a realizar operaciones en coma flotante y vio que el programa dejaba de funcionar.
Visto que algunos estáis pensando en hacer filtros, control vectorial, transformadas de Fourier, …, creemos que debéis saber a qué atenerse y sacar partido a las posibilidades de la unidad de coma flotante o FPU (la culpable del fallo).
El problema del otro día fué que el compilador estaba configurado para generar instrucciones máquina pero la FPU no estaba activa. En la siguiente imagen se muestra la opción de Keil que hay que tocar para cambiar esto.

Si hubiésemos desactivado la opción «Use FPU» no habríamos tenido problemas. En ese caso, las operaciones en coma flotante se harían por software, igual que con los Cortex-M3, PICs, 8051s y similares. Cuidado, que no todos los Cortex-M4 tienen FPU.
Nuestra es la decisión de activar o no la FPU. Para que sea fácil, se sugiere editar el archivo de configuración system_stm32f4xx.c y añadir a la función SystemInit() el siguiente fragmento de código (comprueba antes si ya están presentes estas líneas en este fichero)
  /* FPU settings ------------------------------------------------------------*/
  #if (__FPU_PRESENT == 1) && (__FPU_USED == 1)
    SCB->CPACR |= ((3UL << 10*2)|(3UL << 11*2));  /* set CP10 and CP11 Full Access */
  #endif
Así, cualquiera que sea la configuración que se tenga en el compilador, el programa no fallará. Esto deberíamos tenerlo presente siempre que adaptemos programas del M3 o del M4 y añadamos «floats».
Si la intención es aprovechar la FPU, es muy importante informarse antes sobre sus características para sacarle partido, o lograremos todo lo contrario. Todos los fabricantes de M4F suelen tener una nota de aplicación al respecto. Si se va a usar el STM32F4xx, se sugiere leer la nota de aplicación sobre el uso de la unidad de coma flotante.
STM32F4 Discovery and printf() redirection to debug viewer in Keil MDK-ARM
Objective
The ARM Cortex-M architecture includes a facility for sending/receiving user data through special debug ports. This facility is well suited for typical printf() debug practices, where a typical serial port is utiliced. In theses cases, the idea is to write in my program something like this,
#include <stdio.h>

void main (void) {
   printf("Hello, world!");
}
and use the «Debug (printf) viewer» option avaible in Keil MDK-ARM (and other environments) to show a terminal where messages are received. See bellow

These are my notes in order to get this mechanism working on the STM32F4 Discovery kit using the Keil environment.
Some vocabulary.
ITM:
SWV: Serial Wire Viewer
St-Link/V2 upgrade and drivers
The STM32F4 Discovery includes a built-in St-link/v2 debug interface. According with its manual, the SWV facility is available in this interface and the hardware lines are propagated in the schematic of the Discovery kit.
Steps:
1 – Download drivers and utilities from the support page for St-Link/v2 for Windows Xp and 7
2 – Install drivers (?Uninstall previous driver from the control panel)
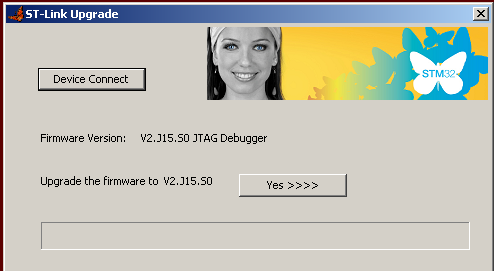
3- Upgrade St-Link/v2 interface of the discovery running the ST-LinkUpgrade.exe utility
Configuring a Keil project
(But not working completly OK)
Assuming you have a working example for the previous debugger version. (Try to) follow these steps:
1 – Open your project and open the «target options» dialog
2 – Select the second «St-link debugger»

3 – Select «settings» and set options according to the next images.

(Here, be carefull with the speed of the core).

(This a trick for flashing the microcontroller)

Redirecting/retargeting printf() in my program
Create a C module that includes the following code and add it to your project
/**
   @file fputc_debug.c
   @brief Trying to redirect printf() to debug port
   @date 2012/06/25
*/

#include <stdio.h>
#include <stm32f4xx.h>

int fputc(int c, FILE *stream)
{
   return(ITM_SendChar(c);
}
And start playing!
To be solved!!!!
The problem now is that the code is not flashed when entering in debug mode. I follow these steps:
1 – Rebuild completly the project (to avoid that the systems assumes that the build has been done)
2 – Flash the microcontroller with the «load» button
3 – Start debugging
